Best Photoshop Tips for Beginners
Photoshop can seem overwhelming at first, but with a few key tips, you can start creating professional-looking images quickly. Whether you’re new to graphic design, photo editing, or digital art, these essential tips will help you build a solid foundation in Photoshop. Let’s dive in!
1. Learn the Interface

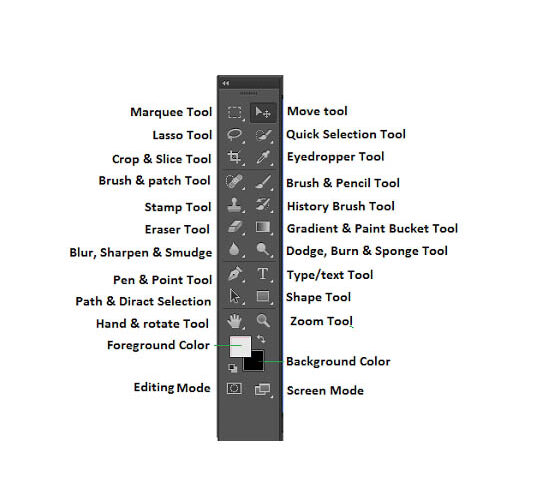
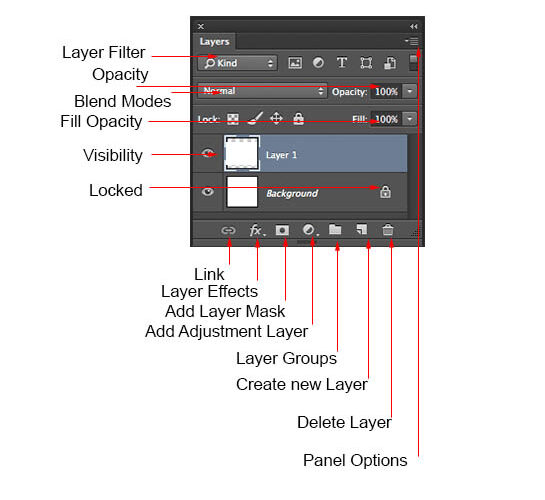
When you first open Photoshop, the interface may look complicated. Start by familiarizing yourself with the essential tools. Key areas to focus on are:
- Toolbox: Contains all your main tools (move, brush, lasso, etc.).
- Layers Panel: Manage layers, blending modes, and layer styles here.
- Options Bar: Adjust settings for the active tool. Understanding these elements will help you navigate Photoshop more effectively.
2. Work with Layers

Layers are one of Photoshop’s most powerful features. Each new element you add to an image (text, graphics, effects) should be on its own layer. This allows you to:
- Edit elements independently without affecting the rest of your image.
- Adjust the opacity, blending modes, or apply layer styles.
- Hide or delete layers when necessary, making your design process more flexible.
Pro Tip: Always name your layers to keep your work organized!
3. Use Keyboard Shortcuts
Learning Photoshop keyboard shortcuts can save a lot of time. Here are a few essential ones:
- Ctrl/Cmd + T: Free Transform to resize or rotate elements.
- Ctrl/Cmd + Z: Undo your last action.
- B: Brush Tool to paint or draw on the image.
- M: Marquee Tool to select rectangular or elliptical areas. Memorizing shortcuts can boost your speed and efficiency while working.
4. Master Selections
Selections allow you to isolate parts of an image for editing. Use these tools to make accurate selections:
- Marquee Tool: Select rectangular or elliptical areas.
- Lasso Tool: Freehand selection.
- Magic Wand: Automatically select areas based on color. For more complex selections, use the Select and Mask option, which refines edges for cleaner results.
5. Practice Non-Destructive Editing
Non-destructive editing means editing an image without permanently altering the original pixels. There are several ways to do this in Photoshop:
- Adjustment Layers: Apply changes like brightness, contrast, or color balance without affecting the original image.
- Smart Objects: Convert layers to smart objects to apply filters or transformations non-destructively.
- Layer Masks: Hide parts of a layer without deleting them, making it easy to reverse changes later.
6. Learn Basic Color Adjustments
Understanding color adjustment tools will help improve your image’s appearance:
- Brightness/Contrast: Adjust the overall lightness and darkness.
- Hue/Saturation: Modify the colors in an image.
- Color Balance: Fine-tune the color tones (shadows, midtones, highlights). Experimenting with these adjustments can make your images more vibrant and visually appealing.
7. Understand Resolution
When working with images, it's important to know about resolution. The higher the resolution, the more detail an image has. For web use, 72 dpi is sufficient, while for print, you’ll need 300 dpi or higher. Always check your resolution settings before starting a project to ensure the best quality.
8. Use Filters and Effects Carefully
Filters and effects can enhance your image, but overusing them can lead to unnatural results. Some popular filters include:
- Gaussian Blur: For softening edges.
- Sharpen: To make your image crisper.
- Liquify: Useful for reshaping objects. Always apply filters to a duplicate layer or smart object to maintain flexibility.
9. Save in the Right Format
When you're done editing, choosing the right file format is crucial. Here’s a quick guide:
- JPEG: For web images or small file sizes.
- PNG: For images with transparent backgrounds.
- PSD: To save your work with layers, so you can edit it later. Always save a PSD file of your work in case you need to make further adjustments.
10. Keep Practicing!
Photoshop is a vast program with many features. The more you use it, the more comfortable you'll become. Start with small projects, follow tutorials, and experiment with different tools and techniques. Over time, you'll build up your skills and gain confidence in your editing abilities.
Background removal and color correction are essential techniques in image editing, particularly for eCommerce and professional photography. Background removal involves isolating the main subject of an image by removing or replacing the background, making the product or person stand out clearly. This is especially useful in creating a clean, distraction-free look for websites or catalogs. On the other hand, color correction enhances the overall appearance of an image by adjusting tones, brightness, contrast, and colors. It ensures that the colors are true to life, improving the visual appeal and making the product look more accurate and vibrant. Both techniques are crucial for producing high-quality, polished images.
By applying these basic tips, you'll quickly improve your Photoshop skills and create stunning visuals with ease. As you get more comfortable, explore advanced tools like brushes, pen tools, and actions to further enhance your work. Remember, practice is key!
Comments
Post a Comment